Simulator & Testing
A desktop simulator built on SDL2 that runs the real ThistleOS kernel, display server, and apps in a host process. Virtual I2C devices, a scenario engine, and a headless assertion framework enable fully automated testing of 10 board configurations without hardware.
✎ Edit on GitHub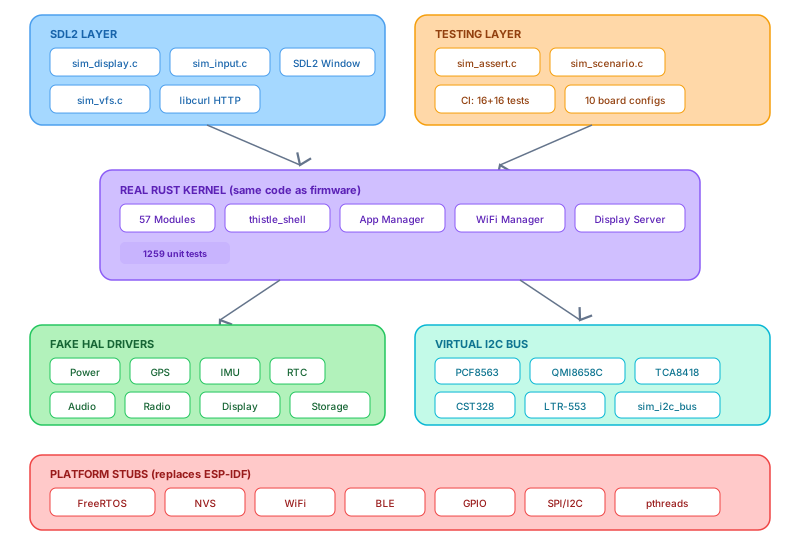
Overview
The ThistleOS simulator compiles the same kernel, display server, window manager, and app code that runs on real ESP32 hardware into a native x86/ARM desktop binary. SDL2 provides the display window and keyboard/mouse input; libcurl provides HTTP networking. Everything else — HAL registration, driver vtables, IPC, permissions, the ELF syscall table — is the real production code.
What the simulator replaces with stubs:
- Hardware buses — Virtual I2C and SPI buses backed by in-memory device models instead of real peripherals.
- WiFi/BLE — Fake scan results and connection state. HTTP requests go through libcurl on the host.
- Flash/NVS — A host filesystem directory (
simulator/sdcard/) mounted as the virtual SD card viasim_vfs. - FreeRTOS — pthreads and POSIX timers replace FreeRTOS tasks and timers.
What the simulator does not test: real-time interrupt latency, actual power consumption, hardware-specific driver quirks, flash wear leveling, and radio RF characteristics. For those, use real hardware.
Quick Start
Prerequisites: SDL2, CMake, a C compiler, Rust (for the kernel crate), and libcurl.
# Install dependencies (Ubuntu/Debian)
sudo apt-get install -y libsdl2-dev pkg-config cmake build-essential libcurl4-openssl-dev

# Install dependencies (macOS)
brew install sdl2 cmake pkg-config curl

# Build
cd simulator
mkdir -p build && cd build
cmake .. && make -j$(nproc)

# Run with default device (T-Deck, 320x240)
./thistle_sim

# Run as T-Deck Pro (e-paper)
./thistle_sim --device tdeck-pro

# Run headless boot test
./thistle_sim --headless --timeout 5000 \
  --assert ../tests/boot_assertions.txt \
  --device tdeck
CLI Reference
| Flag | Argument | Description |
|---|---|---|
--device | NAME | Simulate a specific board. See Supported Devices for the full list. Default: tdeck. |
--headless | — | Run without an SDL window. The framebuffer is allocated but never presented. Required for CI. |
--timeout | MS | Exit after MS milliseconds. Used with --headless to bound test runtime. Typical value: 5000. |
--assert | FILE | On exit, evaluate assertions from FILE against captured log output. Exit code 0 = all pass, 1 = failure. |
--scenario | FILE | Load a JSON scenario file that injects sensor data, GPS coordinates, battery state, and IMU readings into the virtual hardware. |
-h, --help | — | Print usage and the list of supported device names. |
Headless Testing
Headless mode (--headless) is the foundation of automated testing. The simulator boots the full kernel, registers all HAL drivers, launches the window manager and launcher app, then exits after the timeout. Combined with --assert, it verifies that the boot sequence produces the expected log output.
Assertion file format
An assertion file is a plain text file. Each non-empty, non-comment line is a pattern:
+pattern— The pattern must appear somewhere in the captured log output.-pattern— The pattern must not appear anywhere in the log output.- Lines starting with
#are comments.
Example (tests/boot_assertions.txt):
# ThistleOS Simulator Boot Assertions
# +pattern = must appear in output
# -pattern = must NOT appear in output

# Kernel boot sequence
+kernel_init: 0
+display_server_init: 0
+display_server_register_wm: 0
+Launcher launched
+ThistleOS Simulator ready

# Crash indicators
-PANIC
-stack overflow
-abort()
-Guru Meditation
-assert failed
If any + pattern is missing or any - pattern is found, the simulator exits with code 1 and prints which assertions failed.
Scenario Engine
The --scenario flag loads a JSON file that injects state into the virtual hardware layer before and during the boot sequence. This lets you test how the kernel and apps respond to specific sensor readings, GPS fixes, and battery conditions.
JSON format
{
  "power": {
    "voltage_mv": 4100,
    "percent": 95,
    "state": "charging"
  },
  "gps": {
    "latitude": 51.5074,
    "longitude": -0.1278,
    "altitude_m": 11.0,
    "satellites": 8,
    "fix_valid": true
  },
  "imu": {
    "accel": [0.1, -0.2, 9.78],
    "gyro": [0.5, -0.3, 0.1]
  }
}| Section | Fields | Effect |
|---|---|---|
power | voltage_mv, percent, state | Sets the virtual battery voltage, percentage, and charging state (charging, discharging, full). |
gps | latitude, longitude, altitude_m, satellites, fix_valid | Injects a GPS fix into the virtual GPS driver. Apps calling hal_gps_get_position() receive these values. |
imu | accel [x,y,z], gyro [x,y,z] | Sets accelerometer and gyroscope readings on the virtual QMI8658C device model. |
Virtual I2C Bus
The simulator provides a virtual I2C bus (sim_i2c_bus.c) that replaces the ESP-IDF i2c_master driver. When a kernel driver or HAL call performs an I2C read or write, the virtual bus routes the transaction to the appropriate device model based on the 7-bit I2C address.
Device models are registered during board_init() based on the selected device's capabilities. Each model implements a register map that mimics the real hardware closely enough for the kernel drivers to function correctly. Register reads return realistic default values; register writes update internal state that subsequent reads reflect.
The virtual SPI bus (sim_spi_bus.c) follows the same pattern for SPI-attached peripherals like displays and LoRa radios.
Device Models
Five virtual I2C device models are implemented, covering the peripherals found across the supported boards:
| Model | Source | I2C Address | Real Hardware | Key Registers |
|---|---|---|---|---|
dev_pcf8563 | devices/dev_pcf8563.c | 0x51 | PCF8563 RTC | Time, date, alarm, timer, CLKOUT control |
dev_qmi8658c | devices/dev_qmi8658c.c | 0x6A | QMI8658C 6-axis IMU | WHO_AM_I, accelerometer XYZ, gyroscope XYZ, config |
dev_tca8418 | devices/dev_tca8418.c | 0x34 | TCA8418 keyboard controller | Key event FIFO, GPIO config, interrupt status |
dev_cst328 | devices/dev_cst328.c | 0x1A | CST328 touch controller | Touch point X/Y, finger count, gesture ID |
dev_ltr553 | devices/dev_ltr553.c | 0x23 | LTR-553ALS light/proximity | ALS data (lux), PS data (proximity), config |
Input injection functions allow tests and the SDL event handler to feed keystrokes and touch events into the virtual devices:
// Inject a key press into the virtual TCA8418
dev_tca8418_inject_key(0x1E, true);   // key down
dev_tca8418_inject_key(0x1E, false);  // key up

// Inject a touch event into the virtual CST328
dev_cst328_inject_touch(160, 120, true);   // finger down at (160,120)
dev_cst328_inject_touch(160, 120, false);  // finger up

// Set sensor values on the virtual QMI8658C
dev_qmi8658c_set_accel(0.0f, 0.0f, 9.81f);
dev_qmi8658c_set_gyro(0.0f, 0.0f, 0.0f);

// Set light sensor readings
dev_ltr553_set_lux(500);
dev_ltr553_set_proximity(100);
Writing Tests
Adding an assertion file
Create a new .txt file in simulator/tests/ with + and - patterns. Run it manually first:
./build/thistle_sim --headless --timeout 5000 \
  --assert tests/my_assertions.txt \
  --device tdeck
Adding an integration test
Edit simulator/tests/run_integration_tests.sh and add a run_test call. The function signature is:
run_test "test_name" "device" "assert_file" "[extra_args]"Example — testing that the Heltec V3 (128x64 OLED, LoRa, no keyboard) boots and registers its radio driver:
run_test "radio/heltec-v3" "heltec-v3" "$TESTS_DIR/radio_assertions.txt"Using scenarios in tests
Create a JSON scenario file and pass it with --scenario:
run_test "battery/low" "tdeck" "$TESTS_DIR/low_battery_assertions.txt" \
  "--scenario $TESTS_DIR/low_battery_scenario.json"
Rust kernel unit tests
The Rust kernel crate (components/kernel_rs/) contains 1,231 unit tests covering all 57 kernel modules. These run on the host (not on ESP32) with:
# macOS
cargo test --target aarch64-apple-darwin -- --test-threads=1

# Linux (CI)
cargo test --target x86_64-unknown-linux-gnu -- --test-threads=1
The --test-threads=1 flag is required because many kernel modules use global state (HAL registry, app manager, event bus) that is not safe to access from parallel test threads.
CI Integration
GitHub Actions runs four test jobs on every push and pull request to main:
| Job | What it does | Depends on |
|---|---|---|
unit-tests | Verifies C test code compiles and counts test cases. | — |
simulator-boot | Builds the simulator and runs a single headless boot test on the T-Deck device model. | — |
simulator-integration | Runs the full integration test suite: boot tests across all 10 devices, HAL completeness checks, driver init verification, radio/GPS tests, scenario engine tests, and minimal device tests. | simulator-boot |
rust-kernel-tests | Runs all 1,231 Rust kernel unit tests on x86_64 Linux. | — |
The simulator-integration job depends on simulator-boot — if the basic boot test fails, the full suite is skipped to save CI minutes.
Interpreting failures
- Boot test failure — A fundamental regression. The kernel cannot complete its init sequence. Check the log output for PANIC, assert failures, or missing driver registrations.
- HAL completeness failure — A driver failed to register its vtable. Likely a change in driver init code or HAL registration.
- Driver init failure — A virtual I2C device model did not register at the expected address. Check that
board_init()calls the correctdev_*_register()functions for the device. - Rust kernel test failure — A unit test in
components/kernel_rs/failed. The test name and assertion message identify the broken module.
Adding Device Models
To add a new virtual I2C device model:
- Create the source file — Add
simulator/devices/dev_yourchip.c. Implement a register read/write handler that the virtual I2C bus calls. - Declare the registration function — Add
void dev_yourchip_register(int bus_index, uint16_t addr);tosimulator/devices/sim_devices.h. - Register in board_init — In
simulator/board_simulator.c, calldev_yourchip_register()for devices that include the chip. - Add sensor injection (optional) — If the device produces sensor data, add functions like
dev_yourchip_set_value()and declare them insim_devices.h. - Write assertions — Create an assertion file that verifies the device registers at the expected address and the corresponding kernel driver initializes.
The device model only needs to implement the registers that the kernel driver actually reads and writes. Consult the real driver source in components/drv_*/ to determine which registers matter.
Supported Devices
The simulator can emulate all 10 supported ThistleOS boards. Each device model configures the display resolution, available peripherals, and which virtual I2C devices are registered.
| Device | Board Name | Resolution | Keyboard | Touch | Radio | GPS | E-Paper |
|---|---|---|---|---|---|---|---|
tdeck-pro | T-Deck Pro | 320 x 240 | Yes | Yes | Yes | Yes | Yes |
tdeck | T-Deck | 320 x 240 | Yes | Yes | Yes | Yes | No |
tdeck-plus | T-Deck Plus | 320 x 240 | Yes | Yes | Yes | Yes | No |
tdisplay | T-Display-S3 | 320 x 170 | No | Yes | No | No | No |
heltec-v3 | Heltec V3 | 128 x 64 | No | No | Yes | No | No |
cardputer | Cardputer | 240 x 135 | Yes | No | No | No | No |
cyd-s022 | CYD S022 | 240 x 320 | No | Yes | No | No | No |
cyd-s028 | CYD S028 | 320 x 240 | No | Yes | No | No | No |
t3-s3 | T3-S3 | 128 x 64 | No | No | Yes | No | No |
c3-mini | C3-Mini | 128 x 64 | No | No | No | No | No |
Devices with radio and GPS capabilities (T-Deck Pro, T-Deck, T-Deck Plus) register virtual LoRa radio and GPS drivers. The T-Deck Pro additionally uses the e-paper display path with simulated partial/full refresh modes. Minimal devices like the C3-Mini register only a display and storage driver, making them useful for testing the kernel's graceful handling of missing peripherals.